Depending on who you talk to, runningtubelesstires can either be the greatest thing since sliced bread, or a marketing ploy to get people to buy new products. We have always stood by the fact that if you don't want to runtubeless, you don't have to. However if you want to runtubeless, then we want to make it as easy as possible.
Enough Already. . .Show me the tricks!
Over the past 6 years we have set up thousands of wheels tubeless and have compiled quite a bit of knowledge in the best way to set up wheels as well as some things to be careful of.
Tip #1 - How to set up a wheel
If the wheel you currently have does not havetubelesstape installed (or if you are re-taping a wheel) you need 4 things to set up a wheeltubeless. To begin this process you must have a rim that is rated fortubelessuse.
Watch our video below on how to set up a wheeltubeless.
Tip #2 - How to install those tires
Tubelesstires do fit a little tighter than non-tubelesstires, and they also have a stronger bead. This can make for tires that are a bit harder to install (especially when brand new). We have a tire mounting trick that will make installation WAY easier. Get ready to shake those wheels!
Note that in our experience the new Conti GP5000tubelessfits WAY tighterthan any other tire we have encountered. Even with the tire mounting trick and multiple tire levers it may be very difficult to install that tire on most rims.
Tip #3 - Be careful with those tire levers!
Tire levers can be very helpful - if used correctly. They can also cause damage, especially to yourtubelesstape when installing tires. If you damage thetubelesstape and expose a spoke hole then your tire will not hold air pressure. All the air will escape into the cavity of the rim. This is very important because. . .
Tip #4 - Do not pressurize your carbon rim!
Tip #4 is the most important tip. Please read!
This part is only important for road tires at higher pressures when using carbon rims. The following does not apply to lower pressure tires (gravel or MTB) or alloy wheels.
If you have atubelesstape failure and all of the air from your tire escapes into the cavity of the carbon rim this can pressurize the inside of the rim. All carbon rims have thinner walls that can not handle a sudden pressurization. This could potentially cause the side of the carbon rim (where the layers of carbon are not as thick) to suffer a failure.
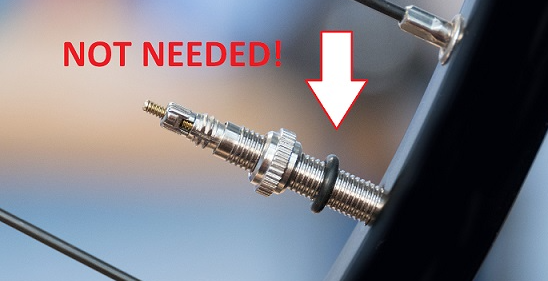
We highly discouragetubelessvalves with a rubber seal!
When you are trying to create an air tight seal, you want that air tight seal to be between the rim bed and the top of thetubelessvalve. The area between the valve nut and the rim does NOT need to be air tight. If a sudden rush of air enters a carbon rim and your rubber seal is not allowing air to escape this is when your rim cavity can pressurize.
The Boyd Cyclingtubelessvalves do not trap the air inside a rim cavity.
By allowing a space between the valve the valve hole opening this will allow air to escape if needed, protecting your rim should a sudden pressurization occur. ALL Podium level wheels (road, gravel, cx, and MTB) now come withtubelesstape installed andtubelessvalves installed.
If you notice air or sealant leaking between the rim and the valve nut
This is usually a tell tale sign that air from your tire is escaping into the rim, traveling to the valve opening, and escaping. The best thing to do in this situation is to remove the tire, inspect the tape, and probably do a fresh install with newtubelesstape. Go back to Tip #1 for the best way to do that.
Tip #5 - Brand new tubeless tape makes it hard to install tires!
When tubeless tape is brand new it usually hasn't been pushed all the way down into the center channel of the rim.
Once you have the tires inflated (either tubeless or with tubes) the air pressure will push the tubeless tape all the way down into the center channel. This will make that first tire installation very difficult, but future tire installations much easier as that center channel diameter has gotten smaller.
So, your first tire installation with brand new tubeless tape (or a brand new wheel) may be very difficult. However, once you get them mounted and the air pressure of the inner tube presses that tape down into the center channel it should be a lot easier to install future tires (or change a tube on the side of the road).
Boyd's Pro Tip! If you have some time and have a loose fitting older tire, mount that tire with an inner tube and let it sit at full pressure for at least a day. This will help to push your tape down into the center channel and will make mounting the tire you want to ride MUCH easier.